The art adventures of Delia and Leslie, two friends from South Florida who enjoy being Virgos... and drive everyone else crazy along the way.


Thursday, July 26, 2012

Stamp Carving

Posted by Delia:

Today we worked on making stamps that we could use in our designs.
The steps to making a stamp are relatively easy:
1. Choose an image.
2. Use tracing paper over the image and color over image with black pencil on the tracing paper.
3. Transfer the image to the block by turning over the tracing paper and burnishing the image.
4. Once you lift off the tracing paper, you will see the areas that need to be removed or carved to create your stamp.

We gathered our supplies:
Carving tools and blocks. The pink carving block is Speedball brand and the white is Utrecht. The Speedball brand was more flexible and easier to work with. The Utrecht brand crumbed very easily.


Speedball hand press.


Here's Leslie making a stamp with a linoleum block. As you can see from the stamped image, it came out pretty good.

This is the stamp that I made from the Utrecht block. This was my first attempt to make a stamp. I probably should of started out with a less detailed image but I learned a lot and am definitely going to try it again.

Fabric Journal

Posted by Delia:

We decided that a great way to showcase our finished projects would be put them in a fabric journal. So the next step was to make the base pages of our fabric journal. I happen to have a drop cloth that I purchased at Harbor Freight. We liked the texture and weight of the drop cloth and decided to use it.

Here's the label from the drop cloth.
Leslie is cutting the drop cloth down to size. We decided on approximately 11" by 20" pages that would be folded in half. We are making six pages each to yield a twelve page journal (yeah, we are pretty ambitious).
Here I am sewing away!
Here are the two Virgos!
We needed to sew a seam around the edges of the fabric pages so that they would not fray.


Yay, one down, five more to go! Next we will decide how to bind the pages together.


Tuesday, June 26, 2012

Shiva Paintstiks

Posted by Leslie:

On Sunday, we met at Delia's house to play with Shiva Paintstiks on fabric. We both own quite a few colors and while Delia hadn't yet used them, I had tried them a little and didn't find my results to be so great. So, this was a perfect opportunity for us to put them to the test. First, we tried stenciling.

Delia's flower stencil...


My alphabets and some stencils from Cedar Canyon...


Neither of us was thrilled with the results. There's a lot of rubbing involved with stencil brushes to get a dark color down and the Paintstik still gets under the stencil if you're not careful enough. It's also very messy, with all the scrapings of the "skin" coming off. We wondered why this product would be any better than regular paint. (The alphabet on the upper right resulted from just rubbing the remains of paint on the stencil!  Messy!!!)

So, we thought, maybe the magic of Paintstiks is in rubbings.  We tried a variety of different items under our fabric. Rubbing plates of various depths and materials..


Above are plastic leaf rubbing plates from the teacher's supply store.  Below is a rubber stamp.


After watching some online video tutorials, we learned that the rubbings work best when you use the side of the Paintstik (a larger surface), rather than the point. In the swirl above, the turquoise was done this way, compared to the point of the black sample.  In the turquoise leaf samples above, the sharpest image (lower right side) also resulted from the side of the Paintstik.

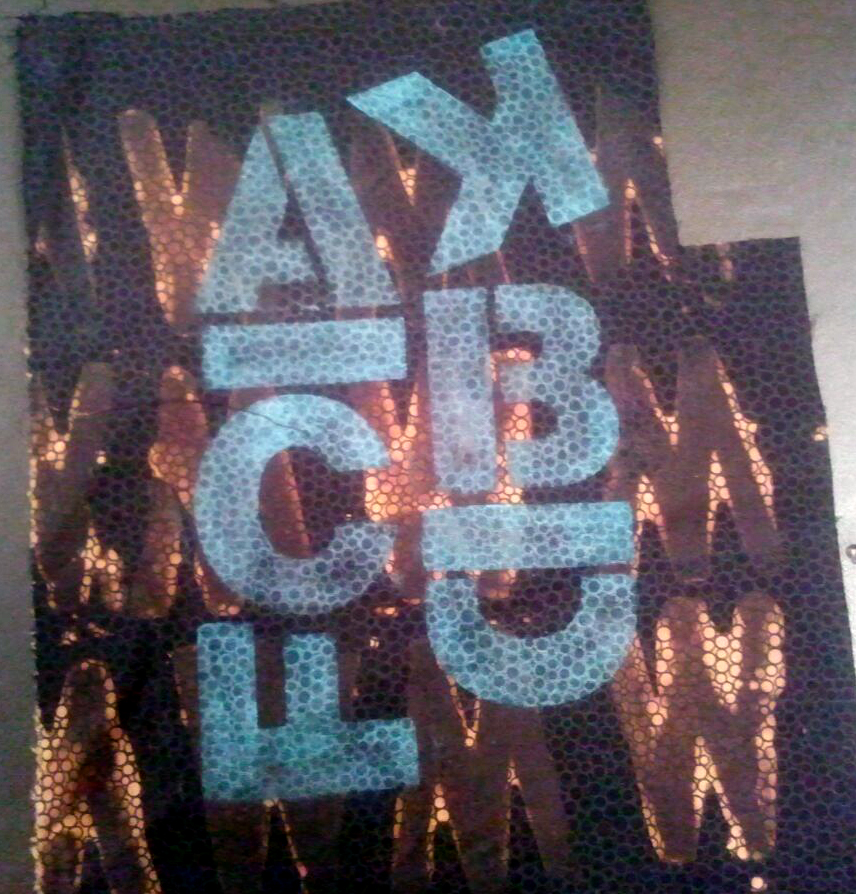
We also found we liked the look of the iridescent colors best when they're on a dark background, like this stenciled alphabet on a black tone-on-tone fabric I had unsuccessfully stamped previously with bleach pen.


Finally, we tried to see what plain old oil pastels could do for us.  Delia had a set of inexpensive Reeves oil pastels. Here are my results with stencils and rubbings.  A little lighter, but sharp and MUCH less messy!!!


And here's a comparison of rubbings on hard plastic embossing plates for metal.  You can see the sharper image of the oil pastel versus the Shiva Paintstik.


We were glad we had taken the time to experiment with the Paintstiks, but concluded:
1.  You need too many extra supplies (spray adhesives to keep the rubbing plates from moving around)
2.  They take too much effort to get a dark color when stenciling
3.  They are messy, messy, messy!  (We had paint scrapings everywhere!  Good thing for baby wipes!)
4.  They are expensive.

Bottom line... we think there must be some specific use for Paintstiks - why they're any better in certain situations than other materials - and we're open to it.  At the moment, we like the oil pastels better.


Sunday, June 3, 2012

Getting Started

Posted by Leslie:

Today, we met at my house to begin our summer art project - a technique-driven series of pieces we are doing on fabric, with the ultimate goal of creating a fabric book for each of us.  I've wanted to try a technique by Judy Coates Perez, where she uses white colored pencils and white china markers as a resist for liquid acrylic inks.  Since I had the inks already, we decided to make this our first effort.

Here's Judy's blog post that shows the technique: http://judyperez.blogspot.com/2012/05/how-can-you-resist-such-simple.html

Judy had written a story in the April/May 2011 issue of Quilting Arts Magazine about painting textiles with Daler-Rowney FW Acrylic Artists' Inks. Because of the cost of these (about $6.20 a bottle in our area), I also bought a couple of other acrylic ink brands and inks - Liquitex, Dr. Martin's Bombay Inks, and  Higgins.  So we tried those.

The results were great!  Delia's paisley... (such pretty colors!)

 Another beauty by Delia...

And this one with the use of salt (something we learned about at Arrowmont)!  Salt on the left side, no salt on the right.

My first two efforts...

I also learned that you can use the inks for stamping. (I rolled the ink on a large stamp with a brayer.)

Finally, I tried using a White-Out pen and a Liquid Paper pen.  These came out great and were so easy to use! 

Our conclusion: We'd choose the white correcting pens over the pencils, and the brands of ink were very similar in usage and results.